
How to use Silicone Sealant?
Silicone sealant is used to finish joints, keep out moisture and fill seams and other gaps. It is elastic, so it can allow for a certain amount of movement. Sealant is available in tubes and cartridges. A cartridge is enough for a seam of around 12-13 meters long with a thickness of 5 mm.
1. Press down on the gun’s release tab and pull the pressure valve. This is the long, metal plunger in the back, usually underneath the release tab. This will allow you to load the tube of silicone sealant.
2. Insert the tube of silicone into the gun. Insert it at an angle, base first, and then push it up into the gun. The nozzle of the silicone tube should be sticking out of the opposite end from the release tab and pressure tab.
3. Adjust the trigger so that it is calibrated with the size of your tube. To do this, squeeze the trigger slowly and gently until the mechanism touches the silicone tube. You will then be able to lock the silicone tube firmly in place.
4. Prepare the surface you wish to seal. Before you apply silicone sealant, make sure that the surface is completely free of any dust, dirt, or particles. Any bits of matter can potentially cause a weaker seal.[5] To prepare your surface:
- Soak a sponge in soapy water and wipe down your surface.
- Rinse out your sponge and use it again to wipe down the area.
- Dry off the area with a towel. Be sure to remove all water completely, as any moisture can cause problems.
5. Cut a hole in the silicone tube. Snip the tube at a 45 degree angle, and as close to the tip as possible. This will ensure that the hole is very small, making it easier for you to control the flow of sealant. You can use either scissors or a utility knife to cut the sealant tube.
6. Test your silicone on a piece of scrap material. If the sealant is not flowing to your liking, snip a little bit more off of the tube. Gradually cut small bits off until the sealant is flowing at the desired pace.
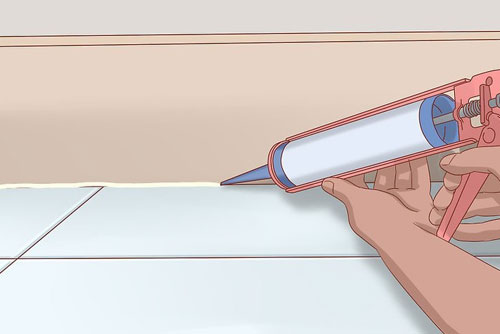
7. Apply the sealant to your surface. Squeeze the trigger as evenly and steadily as possible. Drag the tube nozzle slowly along the seam of your project.
- Spread the sealant evenly. Wet your finger, and have a container of water nearby. Use your finger to spread the sealant evenly. Keep getting your finger wet as you work.
- You can also spread the sealant by pressing a piece of masking tape down onto the bead line. Then, pull the tape away before the silicone gets tacky. This should give you a smooth, straight line exactly where you want it to go.
8. Allow the sealant to dry. While most silicon sealants will feel dry to the touch within 30 minutes to an hour, this does not mean the seal is ready.
- Wait at least 24 hours for the seal to dry before using your project.
- You can try using a fan or a blow dryer on low heat to help the silicone a little faster, but it will still need time to cure.
- You can also purchase a quick-curing silicone caulk. These don't cost any more than other types of silicone caulk, and they'll be water-ready in about 30 minutes.